-
React 16 에 추가된 기능들Knowledge/React 2019. 12. 18. 19:01반응형

React 16 마스터하기 강의를 듣고 정리한 내용입니다.
- Fragment
이전 버전에선 하나의 element만 return 할 수 있는 React의 특성 때문에 여러 개의 태그를 리턴하기 위해선 하나의 부모 태그가 필요했고 이 때문에 의미 없는 태그가 들어가곤 했습니다.
그러나 Fragment를 활용하면 예를 들어
123456789101112131415161718192021222324import React, { Component, Fragment } from 'react';class ReturnTypes extends Component {render() {return (<Fragment><header/><div /><footer /></Fragment>);}}function App() {return (<div className="App"><ReturnTypes></ReturnTypes></div>);}export default App;위와 같이 header, div, footer 태그를 Fragment로 감싸 Return 하면

위와 같이 Fragment로 감싸 리턴한 태그들만 element 목록에 나타나는 걸 확인할 수 있습니다
- return string
엘리먼트가 아닌 string만 return하는 것도 가능해졌습니다.
123456789101112131415161718import React, { Component, Fragment } from 'react';class ReturnTypes extends Component {render() {return "hello";}}function App() {return (<div className="App"><ReturnTypes></ReturnTypes></div>);}export default App;
- createPortals
react는 root 안에서만 작동합니다. 그러나 createPortals를 활용하면 root 밖에 있는 html 엘리먼트에 접근할 수 있습니다.
1234567891011121314151617181920212223242526<!DOCTYPE html><html lang="en"><head><meta charset="utf-8" /><meta name="viewport" content="width=device-width, initial-scale=1" /><meta name="theme-color" content="#000000" /><metaname="description"content="Web site created using create-react-app"/><title>React App</title></head><body><noscript>You need to enable JavaScript to run this app.</noscript><!-- 주목 --><header><h1>Can't touch this</h1><span id="touchme"></span></header><!-- 주목 --><div id="root"></div></body></html><!-- index.html -->위와 같이 root div 형제 효소인 header 엘리먼트 내부엔 기존 react로는 접근할 수 없지만
1234567891011121314151617181920212223242526272829import React, { Component, Fragment } from 'react';import { createPortal } from "react-dom";// createPortal은 react-dom에 있다class Portals extends Component {render() {return createPortal(<Message />,document.getElementById("touchme"));}}const Message = () => "Just touched it";class ReturnTypes extends Component {render() {return "hello";}}function App() {return (<div className="App"><ReturnTypes></ReturnTypes><Portals></Portals></div>);}export default App;위와 같이 createPortal 메소드에 인자로 메세지와 선택자를 활용해 특정한 element를 집어넣으면

접근할 수 있게 되었습니다.
- Error Boundaries with Higher Order Components
이전 버전에서는 컴포넌트의 한 부분에서 에러가 발생하면 다음 Render가 진행되지 않아 전체 UI가 로드되지 않았습니다. 그러나 Error Boundary를 활용하면 에러가 발생한 경우 대체 component를 렌더링해 전체 UI가 망가지는 걸 막을 수 있습니다
예제 코드는 아래와 같습니다
12345678910111213141516171819202122232425262728293031323334353637383940414243444546474849505152535455565758596061626364656667686970717273747576777879import React, { Component, Fragment } from 'react';import { createPortal } from "react-dom";const BoundaryHOC = ProtectedComponent =>class Boundary extends Component {state = {hasError: false};componentDidCatch = () => {this.setState({hasError: true});};render() {if (hasError) {return <ErrorFallback />;} else {return <ProtectedComponent />;}}};// Higher Oreder Components를 활용해 Error Boundary를 활용하는 예// ProtecteComponent를 함수로 받아// componentDidCatch를 활용해 error 발생을 감지하면// Proteced Component 대신 ErrorFallback을 반환해 전체 UI가 깨지는 걸 막는다class ErrorMaker extends Component {state = {friends: ["kyeo-ul", "guem-ja"]}componentDidMount = () => {setTimeout(() => {this.setState({friends: undefined});}, 2000);};render() {}}// 2초뒤 에러를 발생시킴const PErrorMaker = BoundaryHOC(ErrorMaker);// BoundaryHOC로 보호class Portals extends Component {render() {return createPortal(<Message />, document.getElementById("touchme"));}}const PPortals = BoundaryHOC(Portals);// BoundaryHOC로 보호const ErrorFallback = () => "Sorry something went wrong";// 에러 발생 시 리턴할 문구const Message = () => "Just touched it";function App() {return (<div className="App"><PPortals /><PErrorMaker /></div>);// 보호하고 있는 component 리턴}export default App;위와 같이 코드를 작성하면

제대로 로드 되었다가
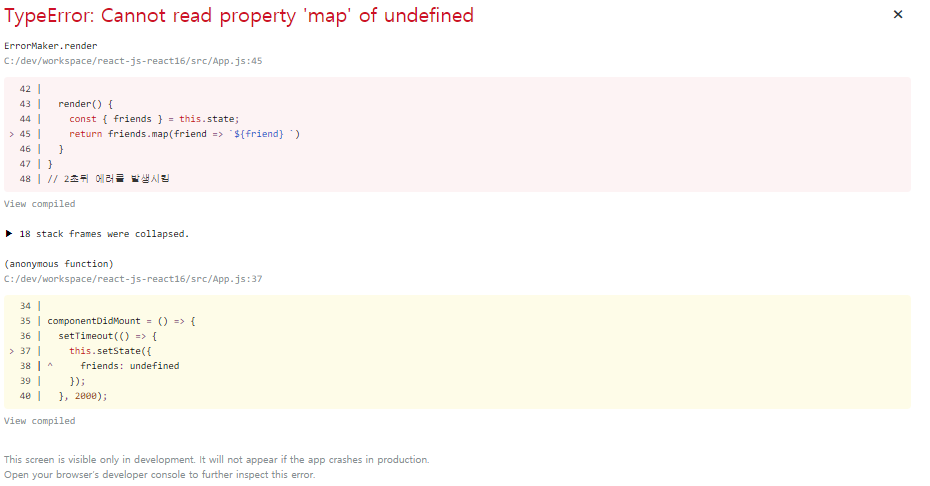
2초 뒤 에러가 발생하더라도 경고 문구를 닫아보면
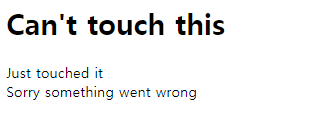
대체 component(ErrorFallback) 가 렌더링 되어 전체 UI가 깨지지 않은 걸 확인할 수 있습니다.
- this.setState(null)
react16에서는 setState(null)을 활용해 state와 component 업데이트를 제어할 수 있게 되었습니다. 예를 들어
1234567891011121314151617181920212223242526272829303132333435363738394041424344import React, { Component } from "react";const MAX_PIZZAS = 20;class Controlled extends Component {state = {pizzas: 0};render() {return (<button onClick={this._handleClick}>{`I have eaten ${pizzas} ${pizzas === 1 ? "pizza" : "pizzas"}`}</button>);}_handleClick = () => {this.setState(eatPizaa);// eatPizaa를 활용해 state를 업데이트 합니다};}const eatPizaa = (state, props) => {// eatPizaa에선const { pizzas } = state;if (pizzas < MAX_PIZZAS) {return {pizzas: pizzas + 1// pizzas가 MAX_PIZZAS 보다 작을 경우 1 즈악한 pizzas를 리턴하지만};} else {return null;// 그렇지 않으면 null을 리턴합니다}};class App extends Component {render() {return <Controlled />;}}export default App;코드를 위와 같이 작성하면

이렇게 null이 리턴되는 경우 component와 state가 더이상 업데이트 되지 않는 걸 확인할 수 있습니다.
참조
반응형'Knowledge > React' 카테고리의 다른 글
React를 시작해보자! create-react-app으로 React 앱 생성하기! ( js ) (0) 2019.11.20