데이터 바인딩을 도와주는 handlebars.js 사용법
ajax로 가져온 데이터를 동적으로 추가해야 하는 상황은 상당히 자주 발생한다.
Handlebars.js는 이런 상황을 좀 더 쉽게 처리할 수 있도록 도와주는 라이브러리.. 라는데
사실 익숙하지 않으면 되려 더 어렵다.
필자도 이번에 처음 써보면서 많이 헤맸는데
헤매면서 알게된, 진작 알았으면 좋았을 만한 것들을 정리해두려 한다.
- 기본 사용법
기본사용법은 다음과 같다.
1. 템플레이팅할 html을 세팅한다. 이때 데이터 바인딩 시킬 부분은 {{바인딩시킬 데이터의 프로퍼티명}} 의 형태로 적는다.
2. htmlTemplate을 가져온후 Handlebars로 compile 한다.
3. 컴파일한 템플릿에 데이터를 집어넣는다. 이 때 리턴값은 html로 나온다.
4. 리턴받은 html을 target에 innerHTML로 세팅한다.
코드로 보자면 아래와 같다.
|
1
2
3
4
5
6
7
8
9
10
11
12
13
14
15
16
17
18
19
20
21
22
23
24
25
26
27
28
29
30
31
32
33
34
35
36
37
38
39
40
41
42
43
44
45
46
47
48
|
<!DOCTYPE html>
<html lang="en">
<head>
<meta charset="UTF-8">
<meta name="viewport" content="width=device-width, initial-scale=1.0">
<meta http-equiv="X-UA-Compatible" content="ie=edge">
<title>Handelbar</title>
</head>
<body>
<ul id="commentUl">
</ul>
<!-- 1. 템플레이팅할 html을 세팅한다. 이때 데이터 바인딩 시킬 부분은 -->
<!--{{바인딩시킬 데이터의 프로퍼티명}} 의 형태로 적는다. -->
<script type="template" id="commentTemplate">
<li class="list_item">
<div>
<div class="review_area">
<p class="review">{{comment}}</p>
</div>
<div class="info_area">
<div class="review_info">
<span class="name">{{name}}</span>
</div>
</div>
</div>
</li>
</script>
<script type="text/javascript" charset="utf-8">
// 데이터
var data = {
comment : '굿' ,name : "초보"
}
//2. htmlTemplate을 가져온후 Handlebars로 compile 한다.
var commentTemplate = document.querySelector("#commentTemplate").innerHTML;
var commentBindTemplate = Handlebars.compile(commentTemplate);
//3. 컴파일한 템플릿에 데이터를 집어넣는다. 이 때 리턴값은 html로 나온다.
var resultHtml = '';
resultHtml += commentBindTemplate(data);
// 4. 리턴받은 html을 target에 innerHTML로 세팅한다.
var commentUl = document.querySelector("#commentUl");
commentUl.innerHTML = resultHtml;
</script>
</body>
</html>
|
|
|
|
이 코드를 실행시키면 아래와 같이 잘 작동한다

- 데이터가 배열일 경우
그런데 만약 데이터가 아래와 같이 배열로 들어있다면 어떻게 해야할까?
|
1
2
3
4
5
6
7
8
9
|
var data = {
comments : [
{comment : '굿' ,name : "김춘삼" },
{comment : '별로' ,name : "허준" },
{comment : '좋았음' ,name : "대장금" },
{comment : '음..' ,name : "김두한"},
{comment : '가성비가 그닥..',name : "시라소니" }
]
}
|
아주 쉽다. 템플릿 HTML만 아래와 같이 바꿔주면 된다
|
1
2
3
4
5
6
7
8
9
10
11
12
13
14
15
16
|
<script type="template" id="commentTemplate">
{{#each comments}}
<li class="list_item">
<div>
<div class="review_area">
<p class="review">{{comment}}</p>
</div>
<div class="info_area">
<div class="review_info">
<span class="name">{{name}}</span>
</div>
</div>
</div>
</li>
{{/each}}
</script>
|
이렇게 each를 사용해 배열명을 적어주면 forEach처럼 잘 작동한다.

여기까지는 별로 어려운 게 없다 그러나..
- 배열갯수보다 적게 붙이고 싶다면? 예를 들어 배열 갯수가 다섯개인데 그 중 세개만 붙이고 싶다면?
여기서부터가 필자가 헤맨 부분이다.
배열 내용을 붙이려면 each를 써야하고 그럼 배열 갯수만큼 도는데 어떻게 배열 갯수보다 적게 붙일 수 있지?
이것 저것 찾아본 결과 이건 기본 제공 기능만으로는 구현할 수 없고 Handlebars의 registerHelper와 index를 사용해야 한다. 이를 위해선 먼저 template을 아래와 같이 바꿔야한다.
|
1
2
3
4
5
6
7
8
9
10
11
12
13
14
15
16
17
18
|
<script type="template" id="commentTemplate">
{{#each comments}}
{{#ifThirdOver @index}}
<li class="list_item">
<div>
<div class="review_area">
<p class="review">{{comment}}</p>
</div>
<div class="info_area">
<div class="review_info">
<span class="name">{{name}}</span>
</div>
</div>
</div>
</li>
{{/ifThirdOver}}
{{/each}}
</script>
|
{{#ifThirdOver @index}}
{{/ifThirdOver}}
가 추가된 걸 볼 수 있다. ifThirdOver는 기본 제공 예약어는 아니다. 이 후에 만들 Helper함수 이름으로 임의로 정한 것이이고 @index는 배열의 index를 반환해주는 예약어다. 지금은 데이터가 5개니 0,1,2,3,4 순으로 찍히는 값이란 말.
그리고 @index는 ifThirdOver 함수의 파라미터다 즉 {{#ifThirdOver @index}} 이런식으로 쓰면 띄어쓰기 뒤의 값이 앞의 함수에 파라미터로 들어간다. 그럼 그 파라미터를 받은 ifThirdOver 함수를 알아보자
|
1
2
3
4
5
6
7
8
9
10
11
12
13
14
15
16
17
18
19
|
var commentTemplate = document.querySelector("#commentTemplate").innerHTML;
var commentBindTemplate = Handlebars.compile(commentTemplate);
// 코멘트가 3개 이상일 경우 3개까지만 세팅되도록 하는 Handlebars Helper method
Handlebars.registerHelper('ifThirdOver',function(index, options){
if(index < 3){
return options.fn(this);
} else {
return options.inverse(this);
}
});
var resultHtml = '';
resultHtml += commentBindTemplate(data);
// commentUl 에 li 세팅
var commentUl = document.querySelector("#commentUl");
commentUl.innerHTML = resultHtml;
|
위 아래 부분은 '그래서 위치를 어디에 넣으라는거야?' 하는 분이 계실까봐 (실제로 필자가 포스팅 보며 자주 그런다) 집어 넣은 부분이고 Handlebars.registerHelper('ifThirdOver',function(index, options){ } 부분만 보면 된다.
index를 파라미터로 받아서 index가 3보다 적을 경우 options.fn(this); 를 리턴하고 그렇지 않은 경우엔 options.inverse(this); 를 리턴한다. 나도 이 부분이 정확히 어떤 의미인지는 파악하지 못했으나
return options.inverse(this);는 return false 같은 거고 return options.fn(this); 는 정상 작동 같은 거라 이해했다.
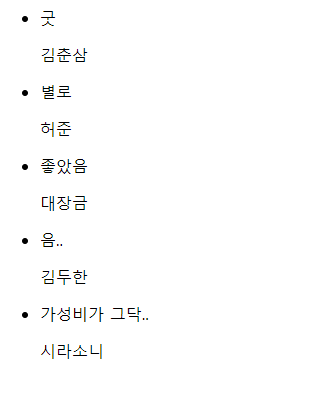
실제로 그렇게 작동한다

굳. 이제 마지막 미션만 남았다.
- each가 도는 중에 다른 배열에 있는 데이터도 바인딩하고 싶다면?
이게 제일 어려웠던 부분인데 해결은 매우 쉬워 허무했다. 일단 좀 더 자세한 상황 설명을 위해 데이터부터 보자
|
1
2
3
4
5
6
7
8
9
10
11
12
|
var data = {
comments : [
{comment : '굿' ,name : "김춘삼" },
{comment : '별로' ,name : "허준" },
{comment : '좋았음' ,name : "대장금" },
{comment : '음..' ,name : "김두한"},
{comment : '가성비가 그닥..',name : "시라소니" }
],
displayInfo : [
{ title : '전시' }
]
}
|
이런 식으로 data안에 배열이 2개가 된 상황이다 그리고
|
1
2
3
4
5
6
7
8
9
10
11
12
13
14
15
16
17
18
19
|
<script type="template" id="commentTemplate">
{{#each comments}}
{{#ifThirdOver @index}}
<li class="list_item">
<div>
<div class="review_area">
<h4 class="resoc_name">{{displayInfo.0.title}}</h4>
<p class="review">{{comment}}</p>
</div>
<div class="info_area">
<div class="review_info">
<span class="name">{{name}}</span>
</div>
</div>
</div>
</li>
{{/ifThirdOver}}
{{/each}}
</script>
|
displayInfo.0.title 부분에 저 '전시' 라는 타이틀을 넣고 싶은건데
Handlebar 안에서 배열은 . 으로 접근할 수 있지만 comments가 each로 돌고 있는 중이기 때문에
comments의 하위 배열이 아닌 displayInfo로는 접근이 되지 않는다.
그래서 이걸 어떻게 해야하나 싶어 여기 저기 뒤지고 다니다가 마침내 방법을 찾았다.
그건 바로 ../
Handlebar에서 ../을 쓰면 상위로 올라간다.
즉 여기서는 comments가 each로 돌고 있으니 data로 돌아간다는 말이고
거기서는 displayInfo가 하위 배열이니 접근이 가능하다 즉 아래와 같이
|
1
2
3
4
5
6
7
8
9
10
11
12
13
14
15
16
17
18
19
|
<script type="template" id="commentTemplate">
{{#each comments}}
{{#ifThirdOver @index}}
<li class="list_item">
<div>
<div class="review_area">
<h4 class="resoc_name">{{../displayInfo.0.title}}</h4>
<p class="review">{{comment}}</p>
</div>
<div class="info_area">
<div class="review_info">
<span class="name">{{name}}</span>
</div>
</div>
</div>
</li>
{{/ifThirdOver}}
{{/each}}
</script>
|
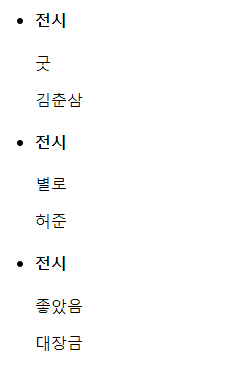
../을 추가해 템플릿을 변경해주면

원했던 결과를 얻을 수 있다
참고
https://programmingsummaries.tistory.com/381
https://www.edwith.org/boostcourse-web/lecture/16784/